

Today we have a quick guide on how to make Excel export as PDF file. We will also go into the more advanced options like how to export a specific worksheet as PDF. Many of these options, with names like PDF/A compliant, are not as intuitive as you may expect. Let’s dive into it.
The 4 Steps for Exporting as PDF
Time needed: 1 minute
Quickly convert any Excel file into a PDF file.
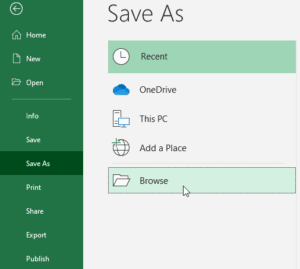
- From the File tab on the Ribbon, click on Save As.

- Click on Browse. A file browser window opens.
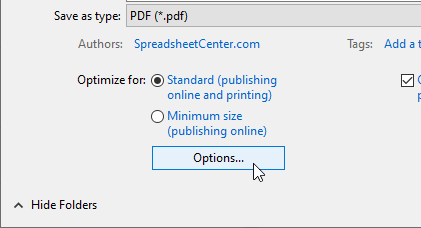
- Select PDF (*.pdf) from the dropdown menu next to Save as type:.

- Save the file.
That’s it.


More PDF saving options
Once you select PDF (*.pdf) from the Save as type: dropdown, the Options… button appears. You can then click on that button to open the Options window.
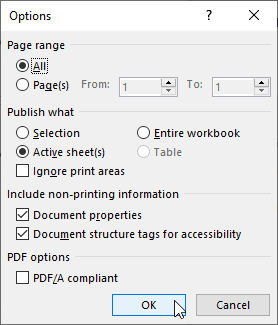
The Options window allows you to do a couple of things:
Page range and Publish what
These two options limit which specific parts of the Excel document will be exported. They can be a little confusing because they both influence the same thing.
Here are a some examples of how to use these:
- If you want to export the currently active worksheet: keep everything the default.
- For exporting the complete workbook: keep everything the default and select Entire workbook under Publish what.
- To export specific worksheets: first, note the worksheet index (the how manieth worksheet(s) you want to export). Then, change Page range to Page(s) and select the worksheet index(es). For Publish what, use Entire workbook.
Document properties
The standard file properties, like the author of the file, are appended to the file if you keep this option checked.
To see the properties for yourself, open the .pdf file in Adobe Acrobat reader. From there, go to File and select Properties. You will be greeted by textboxes for the Title, Author, etc. If you uncheck this option, the textboxes should be empty.
Document structure tags for accessibility
Keep this box checked to improve compatibility with screen reading software. More information on structure tags for accessibility.
PDF/A compliant
Choosing this option will output the PDF file using the PDF/A standard. This standard was designed to preserve documents for a long time.
But what does that mean for you? It will, for example, embed the fonts inside the file instead of linking to it. That way, if the file is opened years from now, the font does not have to be installed on the computer.
And there are more nifty ways PDF/A makes sure the file is still accessible for many years to come but that’s out of the scope of this blog post. You can take a look at a Wikipedia page on PDF/A for more information.
Concluding
That’s all for exporting Excel workbooks as PDF. Were you helped by this post? Or do you have any more tips regarding exporting to PDF? Let us know in the comments.